ASTROPHOTOGRAPHY GUIDE
What is Deep-Sky Astrophotography?
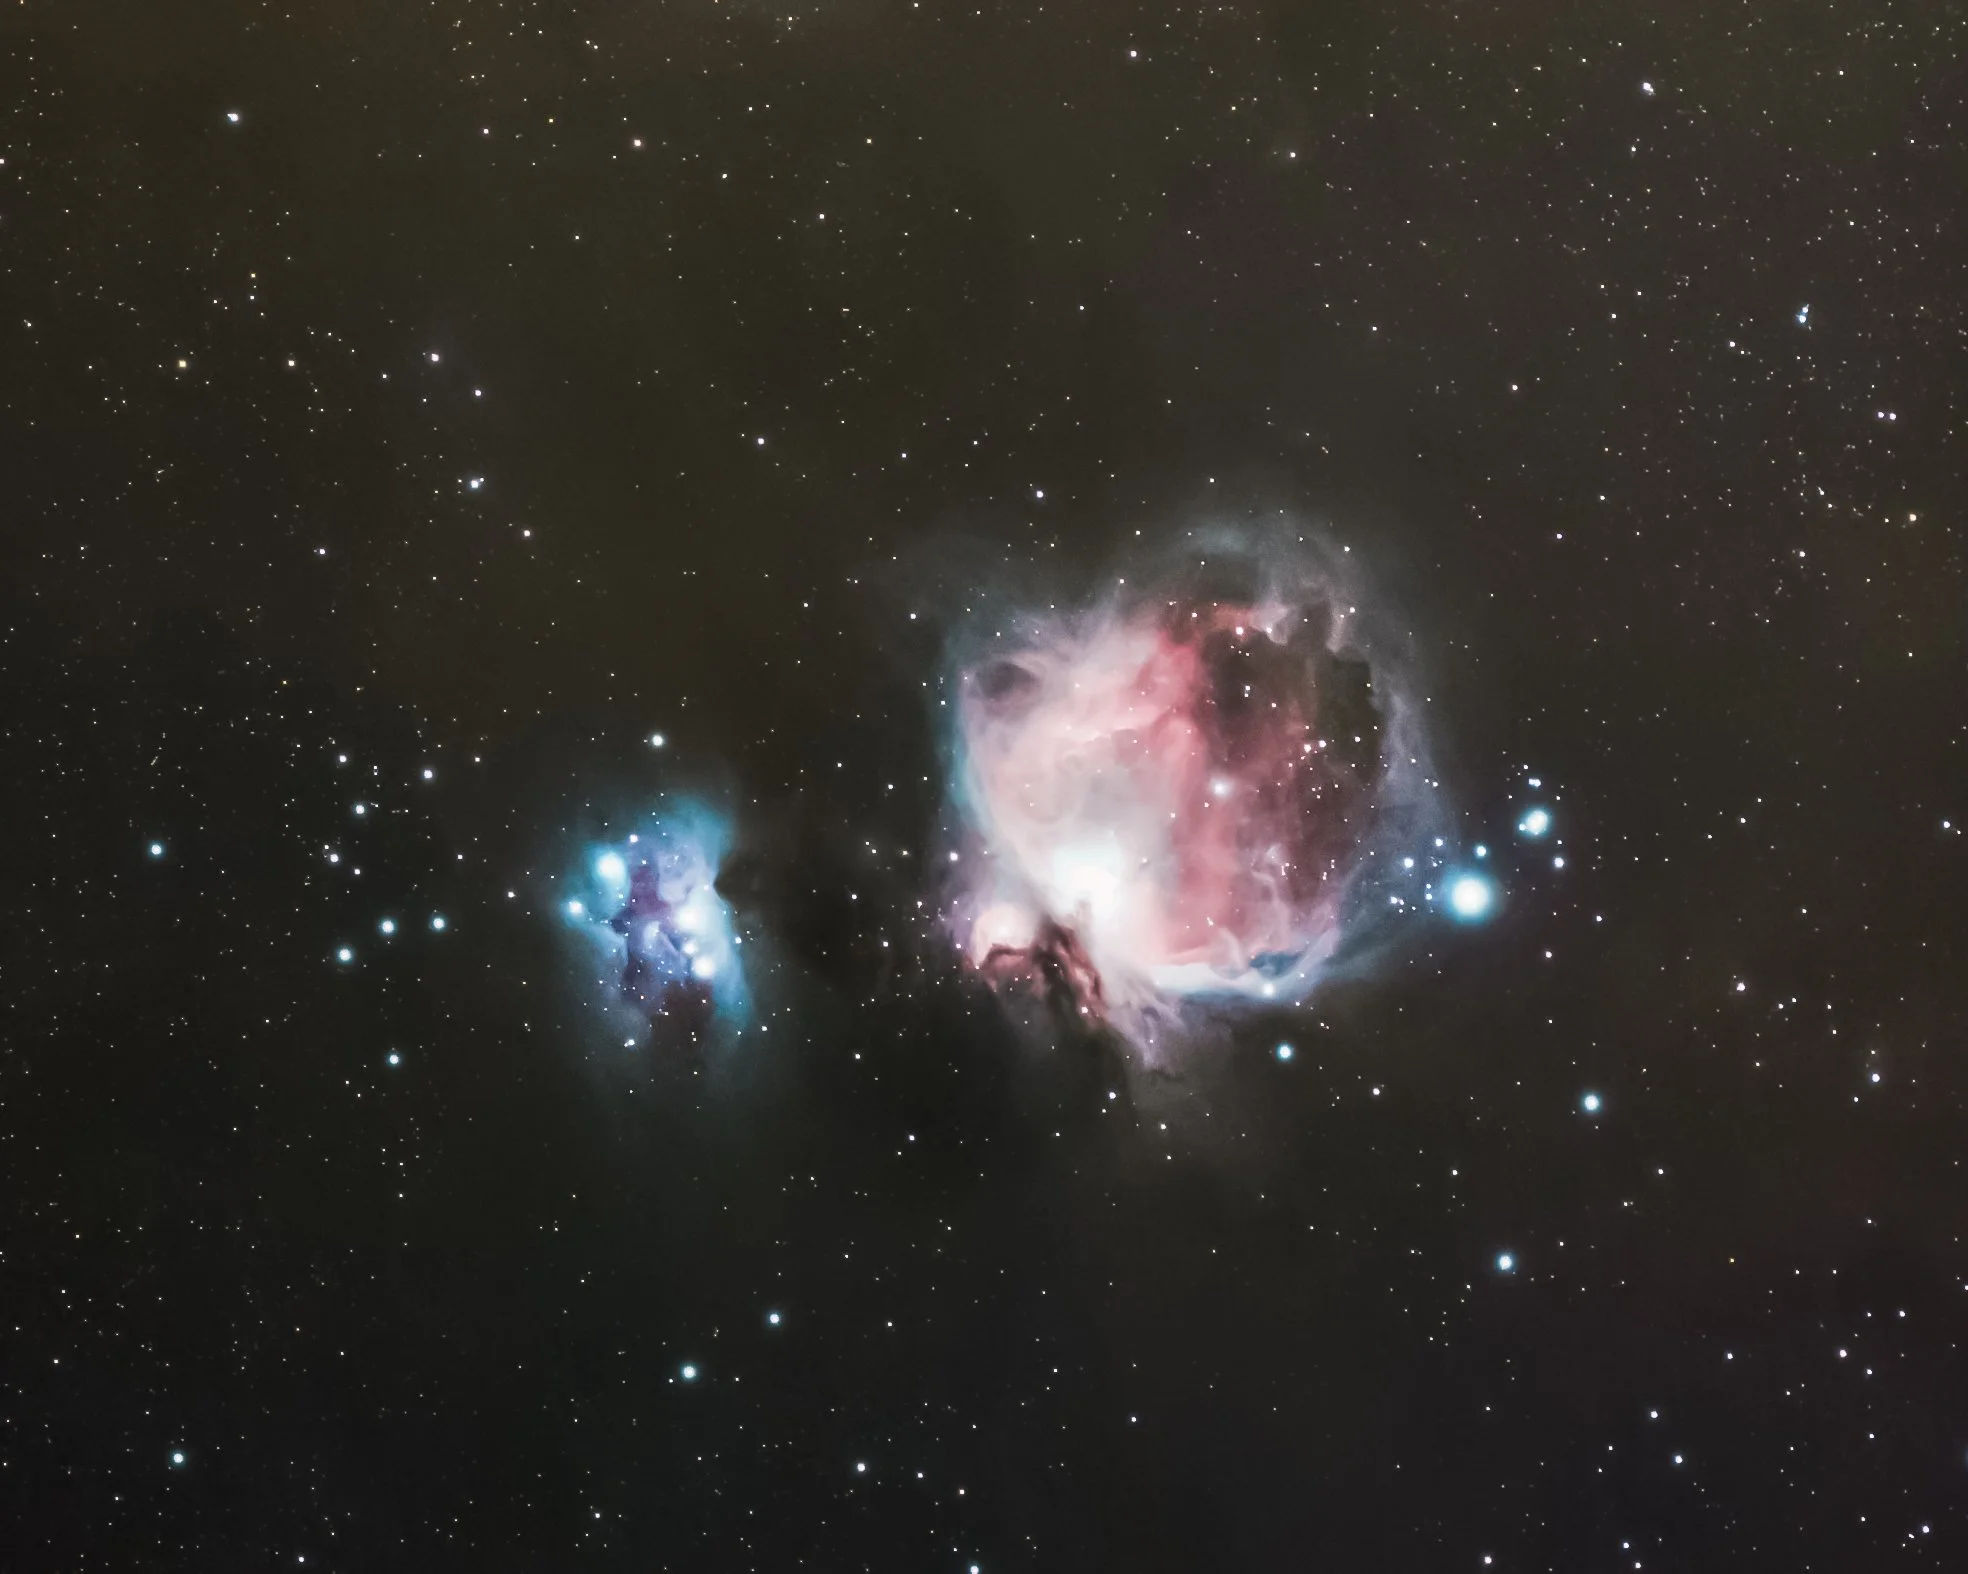
Deep-Sky Astrophotography is the art of capturing space and its contents, usually including but not limited to Galaxies, Nebulae, Star Clusters and more. Using specialized equipment to track stars and compensate for Earth’s rotation, you are able to take long exposures of the night sky and start to reveal its secrets. I’ve become very passionate about capturing space over the past few years, and I can’t wait to share my process with you all!


Starting your astronomy and astrophotography journey
While it might seem a bit daunting to take photos of the cosmos for the first time, this guide is to help steer you in the right direction on where to start. I will also be sharing a breakdown and buying guide of my equipment and editing programs.
Where to Start?
STELLARIUM

The most important first-step is getting to know the Night Sky! There are a lot of great resources out there, but the app I personally have been using is Stellarium. This is a mobile-based star map that allows you to find Stars, Planets, and other Deep-Sky Objects. You are also able to look into the future, to see what the sky will look like on any given night!
Binoculars

Another great tool for visual astronomy is a pair of binoculars! These Celestron Binoculars are a great option that don’t break the bank, and can really help you observe the Moon, Planets, and even some Deep-Sky Objects!
IMAGE ACQUISITION
There are several different ways to capture the night sky; from using a regular DSLR camera, to a dedicated astronomy camera. In this section, I’m going to go over a beginner setup, as well as an intermediate setup.
Cameras

Your camera is going to be the most important part of your whole setup, but it doesn’t mean you have to spend thousands of dollars on an expensive camera right away. Any DSLR on a tripod will absolutely be sufficient when capturing your first images. The first camera I used when imaging was a Sony A7III, which worked great when I was starting out.

For a more intermediate option, I would recommend this Dedicated Astronomy Camera. This cooled CMOS Astronomy camera has a micro-4/3rds sensor, that it incredibly sensitive to a broader spectrum of light. This camera is also cooled with a fan to reduce noise in your images.
Equatorial Mounts
A quality mount is your next most-important piece in your equipment arsenal. A properly aligned equatorial mount can be incredibly powerful in helping you with your long-exposures of the night sky.

My first mount was the Skywatcher Star Adventurer 2. A great single-axis mount. This is a great option for mobile astrophotography, as it’s compact design allows it to be taken on the go.
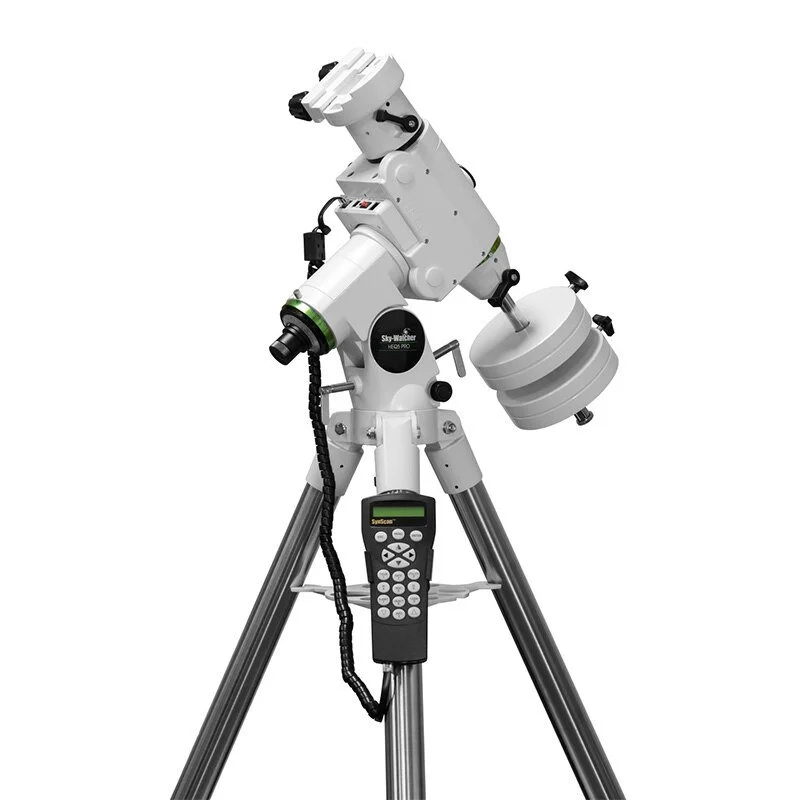
My 2nd and current mount is the Skywatcher HEQ-5 Pro, a big step up from the Star-Adventurer. This 2-axis mount is equipped with a go-to system, that easily frames Deep-Sky targets when polar aligned properly. This robust mount can also handle larger telescopes, with a 30lbs payload capacity.
OPTICS

There are several options as far as glass to use when imaging, such as Camera Lenses, Refractor Telescopes, and Reflector Telescopes. You’ll more than likely want to start off with an affordable lens that’s versatile. I would recommend the Rokinon 135mm F/2.0. A sharp and lightweight prime lens that lets in a ton of light.

The current telescope that I use, is the William Optics RedCat 51. This Quadruplet Apochromatic Refractor is a compact, yet powerful telescope. The high-quality glass elements guarantee razor-sharp details from corner to corner in your images.
Imaging Control
There are several ways to control how your images are captured, whether it’s through software or a regular intervalometer.
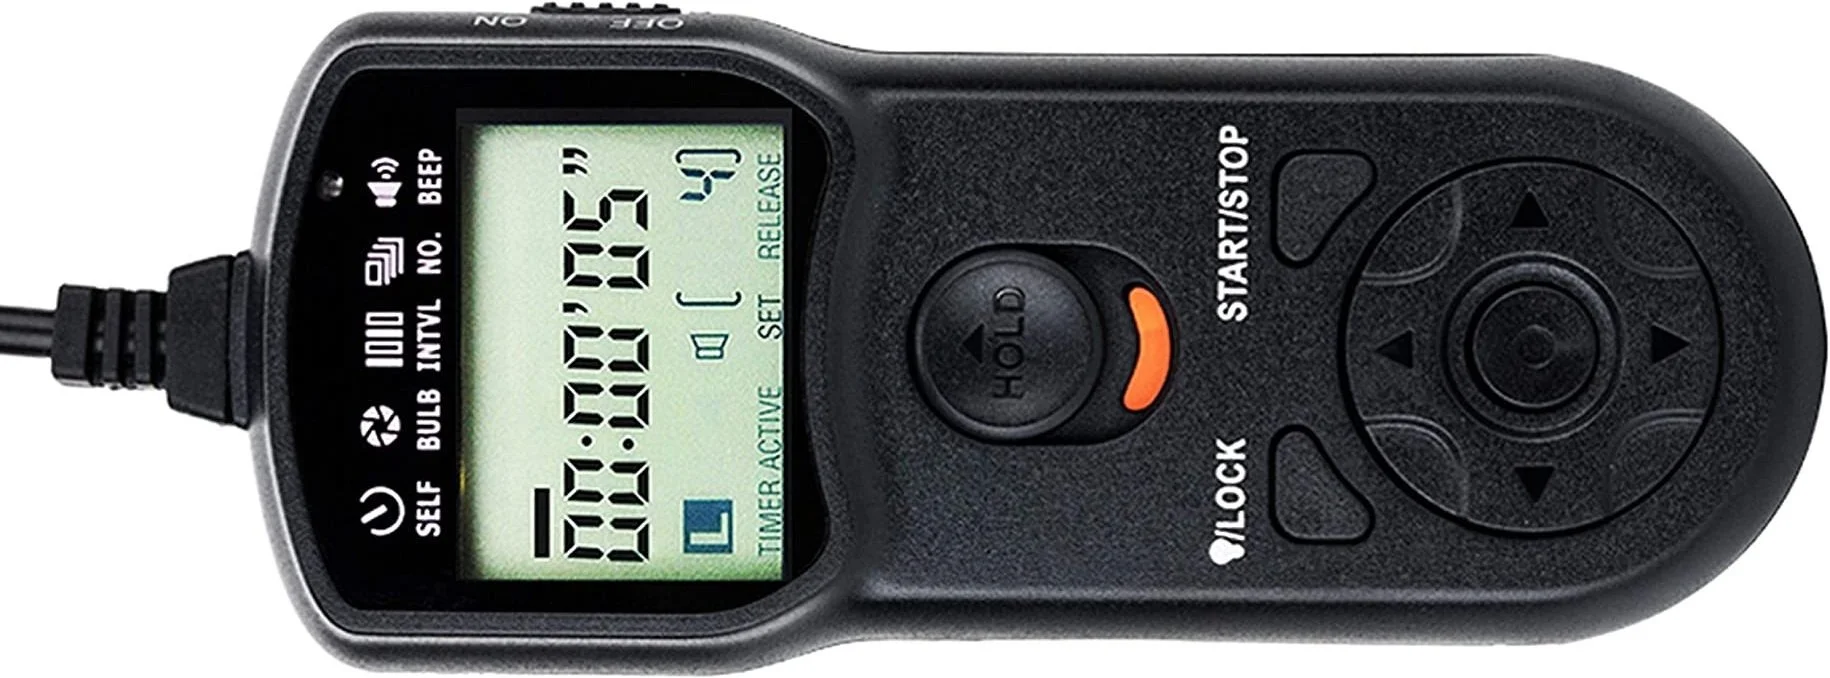
When starting out I only used an intervalometer to automate my imaging session. This small tool allows you to set your custom exposure time, how many photos are taken, and how much time elapses between each photo.

As a part of upgrading my setup, I invested in the ASI Air Pro. This small box will make your nights of imaging so much easier, it’s that powerful. This box can power your entire setup, assist with precise Polar Alignment, can automatically slew to and track targets in the night sky. You can also wirelessly set up automated imaging sessions, where you can leave your telescope, without having to touch it all night. The price tag may seem a bit steep, but it is completely worth it in my opinion.
IMAGE PROCESSING
SIRIL

Image processing can seam very daunting at first especially if you are new to editing, but there are a lot of great programs out there that are powerful, yet easy to use. The program i have always used is Siril. This software can be used for both pre-processing your image and post-processing. The best part about this program is it’s free! There is a full tutorial on their website, which will really help you get up and running with this program in no time.
ADOBE PHOTOSHOP

After running my images through Siril, I use Adobe Photoshop to do most of my processing since it’s the software I’m most familiar with. Another great program that’s way more affordable is Affinity Photo. While it may not have quite as many features as Photoshop, it is still extremely powerful, and a great value for the price.
Accessories and Add-Ons
Guide Scope and Guide Camera


Autoguiding is a wonderful tool that can vastly improve your end result. With a guide scope and guide camera, your tracking becomes way more precise, allowing even longer exposure times without any star trails. The camera I use is the ZWO ASI120MM Mini, and the guide scope is the ZWO 30MM f/4.
This combo works flawlessly with the ASI Air and it’s autoguiding software; It’s incredibly simple and intuitive to use.
If you don’t have the ASI air, another great option is PHD2 guiding. This program is free and works nearly the same way, just as a desktop version.
Light Pollution Filters

Light pollution filters are a great way to filter unwanted light out of your images. These are a great option for people who are unable to easily make it to a dark-sky site. Nothing will ever beat being under a truly-dark sky, but these are still a great tool.
The filter that I use is the Optolong L-Enhance filter. This is a duo-narrowband filter, meaning it only allows 2 narrow bandpasses of light to pass through. In this case, this would be HA (Hydrogen-Alpha) and OIII (Oxygen). These are the wavelengths that are most common in space.
When buying these you can either buy the round filters for dedicated astronomy cameras, or buy clip-in versions for your DSLR.
Additional Resources
While there is only so much I can go over on one page, there is also a ton of free information and tutorials online. Below are a few YouTube channels to check out that helped me get my start.
Astrobackyard
Peter Zelinka
Galactic Hunter
Nebula Photos
Thanks for taking the time to check out my guide! If you have any questions at all feel free to email me, and I’ll get back to you as soon as I can!
Clear skies!